
It's been a little while!
Let me just say that, while my busy-ness in the kitchen has not receded, my energy really has! Having a little one quickly aspiring to walk is exhausting. And rather than stretch myself thin, and feel totally burnt out when it comes to my son, I decided it would be best to take a breather and focus on him.
That said, I'm feeling quite rejuvenated, and missing sharing things here! For anyone who is still reading, I'm excited to say I'll be back afresh after the holidays.
Merry Christmas and Happy Holidays to everyone!
Friday, December 18, 2009
Tuesday, November 10, 2009
How to Make Homemade Pierogi
I recently tried my hand at making homemade pierogi. For those who don't know what pierogi are, they're a Slovankian/Polish dumpling usually stuffed with potato, sauerkraut, or cheese, or some combination (and usually fried onion). You boil them and eat them with LOTS of butter.
You can buy them frozen, but nothing compares to homemade! Since we love them so much and eat them abundantly during Lent, I figured it was my turn to learn.
I used this recipe:
Dough:
3 eggs
1 8 oz. container of sour cream
3 cups AP flour
1/4 t salt
1 T baking powder
Potato Filling:
3 T butter
1/2 cup chopped onion
2 cups cold mashed potatoes
1 t salt (I omitted this because my mashed potatoes are salted already)
1 t white pepper
I cooked up my mashed potatoes and quickly refrigerated them. It'd be easier to make them the night before, which I plan to do next time.

Then I made the dough. First, I sifted together the dry ingredients, and then beat the eggs and sour cream. I gradually added the dry ingredients to the wet ingredients until the dough was formed. I floured my table and kneaded the dough for a bit, and then rolled it out to about 1/4 inch thickness.
This turned out to be a bit thick for our tastes, so next time I'll try thinner. But I'm not that experienced with dough, so I was being careful!

Next, I used a 3-inch cup to cut out the pierogi circles. It worked just fine, considering I didn't have a cookie or biscuit cutter!

After these were all cut out, I took out my potato filling from the fridge and sat a little spoonful of it on each pierogi center. Then, I wet the edges of the pierogi and folded it over. I pressed the edges together firmly - you can also do a little twist on the edges to keep it together, if you're good at that.

I stood for a pause to admire how pretty they'd gotten. Not bad for the first time!

After they're all ready, bring a large pot of water to a boil. Put a few pierogi in the water at a time, careful not to boil too rapidly, and to be very very gentle when stirring so you don't rip them. It just takes about five minutes, and they'll be floating, letting you know they're done!
Just use a slotted spoon to scoop them out, delicately.

Serve with butter!
The verdict: they came out absolutely heavenly. Almost perfect, and almost just like the best pierogi we've ever eaten, which are handmade at a Polish Catholic church near us during Lent. Rolling the dough a bit thinner and adding a little cheese to the filling would make them perfection.
This post is linked up with Tasty Tuesday and Tempt My Tummy Tuesday.
Monday, November 9, 2009
Menu Plan Monday, November 9
Here are some menu highlights from this week!
I'm trying a new dish (the cabbage soup) and a new bread (zucchini).
I'm trying a new dish (the cabbage soup) and a new bread (zucchini).
Healing Cabbage Soup

I was searching for a really delicious, but simple, cabbage soup recipe, and this seems to be a good start. I'm most likely going to add potatoes and spice it up how I think we'll like it, but we tend to enjoy plain food, and I think this will be perfect. I can imagine it'd be yummy with bacon or kielbasi in it.
Mom's Zucchini Bread

Believe it or not, this will be my first attempt at zucchini of any kind! I've never cooked it before, let alone in a bread or dessert sort of recipe, but I've eaten plenty of zucchini bread and loved it.
Slow Cooker Pot Roast

I found this example for a tried-and-true recipe that I always use. I, however, usually use a chuck roast, potatoes, and carrots, and one can of mushroom soup and one onion soup packet. It never fails!
Oven Baked Potato Wedges

These are divine. And so easy! I'm a huge french fry fan, and I love these.
Find more inspiring recipes over at Organizing Junkie!
Thursday, November 5, 2009
How to Make Golabki: Step by Step
{Note: I posted this originally over at The Modern Milkmaid, but I want to repost this along with a few other posts and recipes here so that they will be on file as recipes!}
Golabki are delicious! And scrumptious. And oh-so-good. And also very inexpensive to make. Is it obvious yet how much we love golabki?
BUT they can seem daunting and scary to make, if you've never done it before, and if you're trying to do it by reading instructions, with no visuals. At least I know I require visuals, which is why I learned it from my mother-in-law.
In case you think you don't know what golabki are, you do! They are stuffed cabbage rolls. Some people call them pigs in a blanket. But if you're truly Polish, they're golabki.
The point is, I've decided to make a step-by-step set of photo instructions to show you how to make golabki. Or, more specifically, how to roll golabki once you've got the easy steps done. Here we go!
Start off with my recipe for golabki. Here it is:
Okay! So, after you've done steps 1 and 2 (fried one onion in butter and mixed it with your meat and rice, and steamed, peeled, and reserved all the cabbage leaves from the head), the next step is getting your assembly station all together on the table:
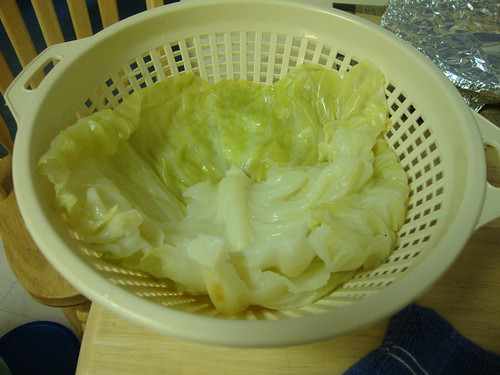
Here's my good cabbage leaves.
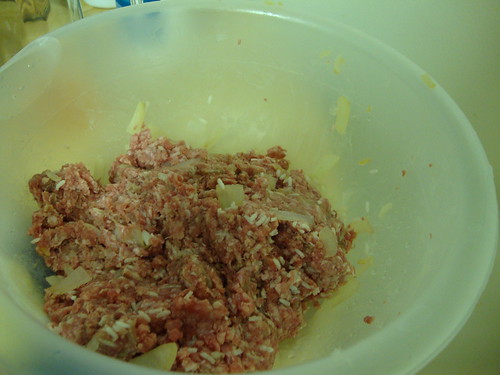
Here's my ground beef, onion, and rice mixture.

And here is my golabki helper, and future golabki-lover. It's not necessary to have one of these, but it's pretty much the best part of the whole process.

Now, see this stem? We want to cut it off and get rid of it. It's hard and not very good to eat, in my opinion.
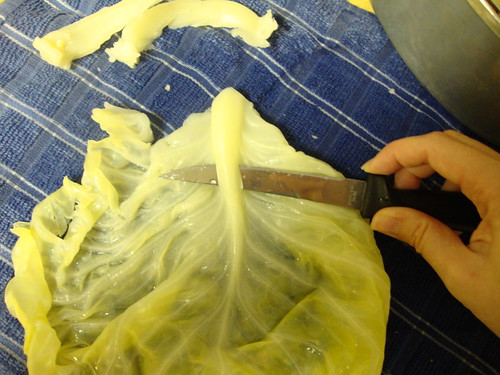
So, with a knife, carefully slice under the stem, being sure not to rip through the leaf. You're just slicing off the toughest layer of the stem.

This is basically what it'll look like afterwards. Much better! And now you're ready to start rolling the cabbage.
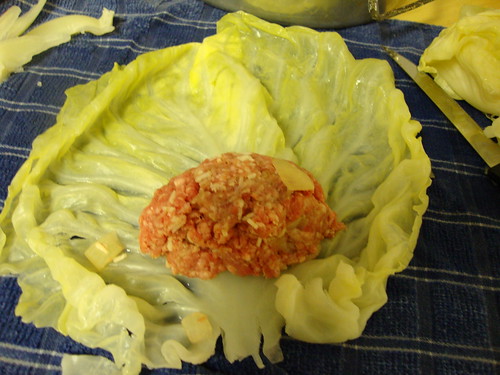
Take as much of the stuffing mixture as you think your leaf can handle, and plop it down toward the bottom. But leave that little space at the bottom, enough so that you can fold it up and over the meat.

So fold the bottom piece of the leaf up and over the meat, and then start rolling. Tuck your sides in close, like this. Be gentle, but make it snug!
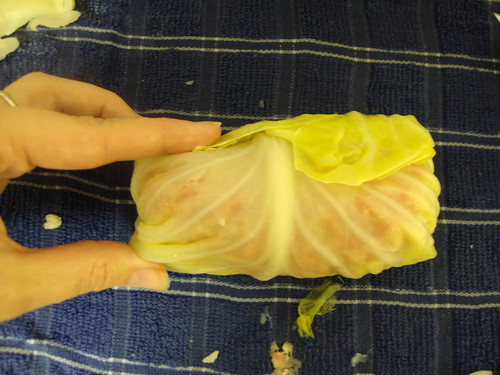
When you're done rolling, it should look like this. Cute, ain't it?
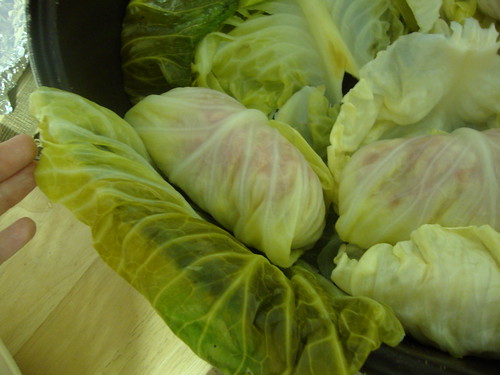
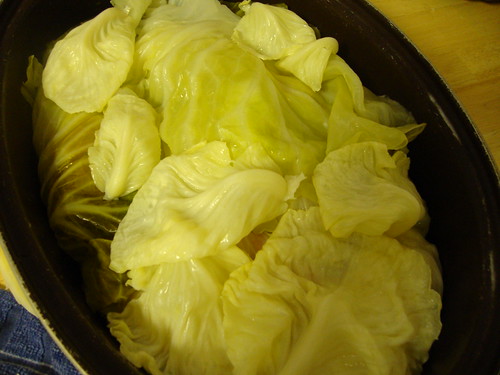
Now, you stick him into the pan with the other ladies and gentlemen. As you can see here, I use a big roasting pan, and I line the bottom and sides with extra leaves or ones I tore while peeling (oops).
I tucked him in there nicely, and folded that extra leaf over. It keeps them snuggly so they don't float up and away and come unrolled while cooking.

So, once they're all in there...
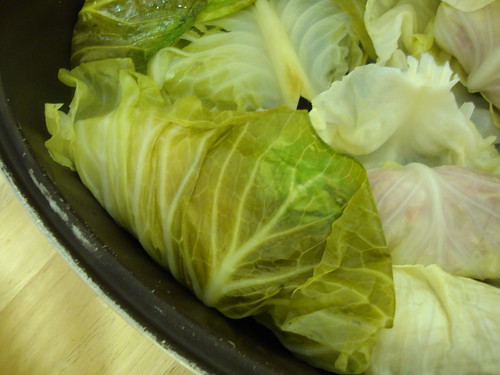
You cover them up with even more leaves that were left over. I use the denser, heavier leaves from closer to the center of the cabbage head for this. This way, the golabki won't float and unroll when simmering.
Now, you stick your pan on the stove and pour in the tomato juice. I use one big can of tomato juice - not sauce! - juice!
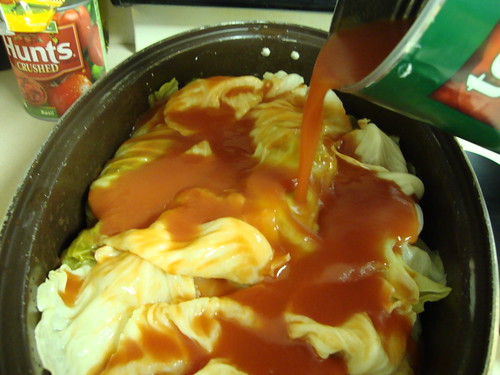
Ignore the crushed tomatoes. That's a different recipe.
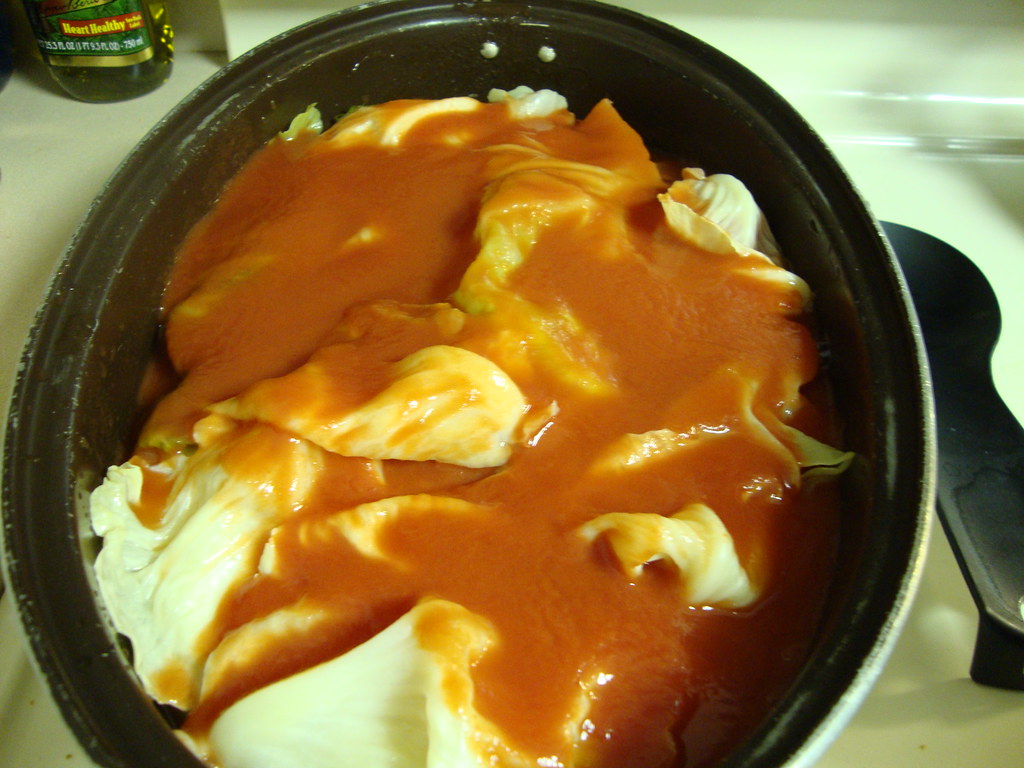
All Tomato-ey.Now we're getting there!
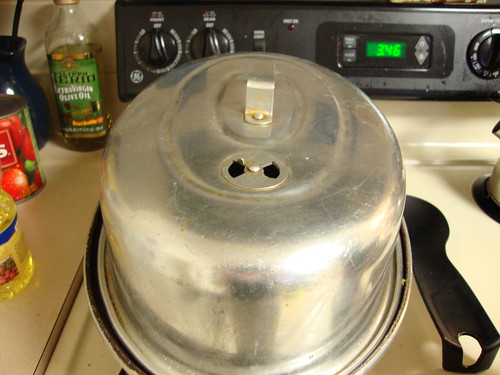
And, finally, cover the roast pan and let these guys simmer. They'll simmer for a few hours. The details about all of that can be found in the actual recipe.

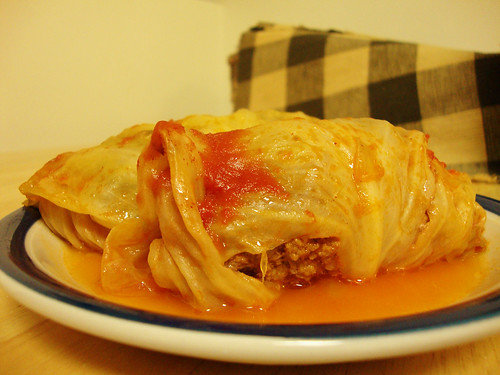
And just when you thought you couldn't wait any longer to eat them, there you are. Yum!
My next venture in Polish cooking will be homemade pierogi. I need to perfect them before Lent! So, stay tuned for my first attempt at making them!
This post is participating proudly in Foodie Friday, The Grocery Cart Challenge Recipe Swap, and Frugal Fridays.
Golabki are delicious! And scrumptious. And oh-so-good. And also very inexpensive to make. Is it obvious yet how much we love golabki?
BUT they can seem daunting and scary to make, if you've never done it before, and if you're trying to do it by reading instructions, with no visuals. At least I know I require visuals, which is why I learned it from my mother-in-law.
In case you think you don't know what golabki are, you do! They are stuffed cabbage rolls. Some people call them pigs in a blanket. But if you're truly Polish, they're golabki.
The point is, I've decided to make a step-by-step set of photo instructions to show you how to make golabki. Or, more specifically, how to roll golabki once you've got the easy steps done. Here we go!
Start off with my recipe for golabki. Here it is:
Ingredients:
1 medium head of cabbage
1 large can of tomato juice
1 medium chopped onion
1/3 cup uncooked white rice
1 lb. ground beef
2 TB butter
salt & pepper to taste
Directions:
1. Melt butter in a pan, and fry the onion until translucent. Meanwhile, core head of cabbage, place in boiling water and boil until partially cooked. Carefully separate the leaves and trim off the stems. Set aside the torn or smaller leaves and line the bottom of a roasting pan with them.
2. In a large bowl, mix together the ground beef, onion, and rice.
3. Take even amounts of beef mixture and roll into the cabbage leaves, folding over and then tucking the sides in and continuing to roll until secure. Place the rolls into the lined roasting pan.
4. Place leftover heavy leaves on top of the rolls to keep them from floating or coming undone. Fill the roasting pan with the tomato juice. Cover and bring to a boil. Reduce heat, and allow to simmer for 2-3 hours, or until cabbage is fully cooked.
Okay! So, after you've done steps 1 and 2 (fried one onion in butter and mixed it with your meat and rice, and steamed, peeled, and reserved all the cabbage leaves from the head), the next step is getting your assembly station all together on the table:
Here's my good cabbage leaves.
Here's my ground beef, onion, and rice mixture.
And here is my golabki helper, and future golabki-lover. It's not necessary to have one of these, but it's pretty much the best part of the whole process.
Now, see this stem? We want to cut it off and get rid of it. It's hard and not very good to eat, in my opinion.
So, with a knife, carefully slice under the stem, being sure not to rip through the leaf. You're just slicing off the toughest layer of the stem.
This is basically what it'll look like afterwards. Much better! And now you're ready to start rolling the cabbage.
Take as much of the stuffing mixture as you think your leaf can handle, and plop it down toward the bottom. But leave that little space at the bottom, enough so that you can fold it up and over the meat.
So fold the bottom piece of the leaf up and over the meat, and then start rolling. Tuck your sides in close, like this. Be gentle, but make it snug!
When you're done rolling, it should look like this. Cute, ain't it?
Now, you stick him into the pan with the other ladies and gentlemen. As you can see here, I use a big roasting pan, and I line the bottom and sides with extra leaves or ones I tore while peeling (oops).
I tucked him in there nicely, and folded that extra leaf over. It keeps them snuggly so they don't float up and away and come unrolled while cooking.
So, once they're all in there...
You cover them up with even more leaves that were left over. I use the denser, heavier leaves from closer to the center of the cabbage head for this. This way, the golabki won't float and unroll when simmering.
Now, you stick your pan on the stove and pour in the tomato juice. I use one big can of tomato juice - not sauce! - juice!
Ignore the crushed tomatoes. That's a different recipe.
All Tomato-ey.Now we're getting there!
And, finally, cover the roast pan and let these guys simmer. They'll simmer for a few hours. The details about all of that can be found in the actual recipe.
And just when you thought you couldn't wait any longer to eat them, there you are. Yum!
My next venture in Polish cooking will be homemade pierogi. I need to perfect them before Lent! So, stay tuned for my first attempt at making them!
This post is participating proudly in Foodie Friday, The Grocery Cart Challenge Recipe Swap, and Frugal Fridays.
Welcome to Smidgen of a Kitchen!
I decided to create this blog when I realized how much I loved to write about food. More specifically, I realized I really wanted to share my experiments on how to flourish while saving money in the kitchen and in the home.
For me, it's not just about surviving, and getting by on noodles and beans for pennies. I'm on a journey with my family to live within our means, escape debt forever, and to prosper and thrive while doing it.
There's no reason why I can't make us amazing food and create a warm, cozy nest on less. So this is my place to grow and learn how, and to share with other talented women who do it, so well, every day!
What's to Come:
- Weekly or ongoing "assignments" for myself (and others, if you want to join in!) where I learn how to make something new. First up: baking bread!
- My own collection of perfected and adapted recipes: all, or mostly, budget-friendly and tasty all at once.
- Lots of how-to posts and certainly some illustrations of what worked and what flopped!
- Good finds and tips on navigating the grocery store without overspending or straying far from your menu plan.
- Tips on how to menu plan effectively, to get the most out of your money!
What else would you like to see here?
Subscribe to:
Posts (Atom)